Usage in FTC
The Boron Canandgyro is primarily targeted at FRC use-cases, but also provides an analog output port suitable for use in FIRST Tech Challenge applications.
This analog port allows for a high-accuracy yaw reading to be bulk-read by the Rev Control or Expansion Hubs without the performance considerations of I2C interfaces, and offers both greater performance and reliability than the Control Hub’s built-in IMU.
And, of course, it has robust ESD protection.
Case considerations
The case that ships with the Boron does not expose the JST-PH port intended for use with the FTC control system.
You will need to remove the Boron from this case by unscrewing the holding screws from the bottom of the case. We highly recommend you 3D print a new case to protect the device from foreign debris and to cover up the FRC-oriented push terminals that may not be relevant to your use case.
One case is available here on Printables, featuring M4 mounting holes on a 32mm grid.
Wiring
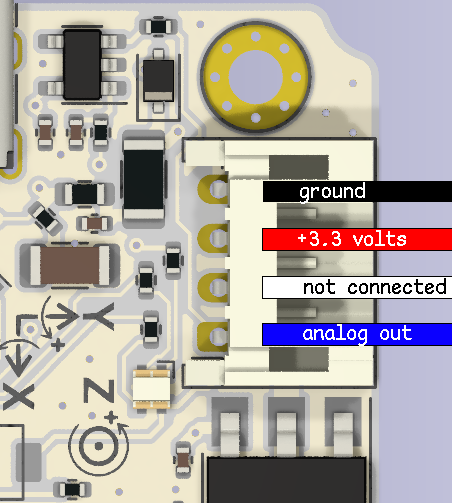
The Boron Canandgyro JST-PH port follows the Rev Control/Expansion Hub standard wiring pinout and can be wired directly into an analog port on a Control or Expansion Hub.
This is sufficient to provide both power and signal to the device.
If plugged into analog port 0-1, the yaw output will be sent to port 0 with port 1 left as not-connected. If plugged into analog port 2-3, the yaw output will be sent to port 2.

We recommend you wire the Boron to the Control Hub specifically so it can be bulk-read with the least amount of latency.
Mounting
Robot configuration
To use an analog input, in the robot configuration menu in either the driver station or the robot controller app, navigate to the Control/Expansion Hub the Boron is plugged into, select Analog Input Devices, and then configure the port it is plugged into as an Analog Input.
Programming the Analog Canandgyro
The Boron will output analog voltages between 0 volts and 3.3 volts. This voltage can be treated as linear from software; inherent analog nonlinearity may contribute up to approximately ~0.5 degrees of error.
The gyro will boot to output 1.65 volts (0 degrees). Voltage increases in the positive yaw (Z-axis) rotation direction and decreases in the negative yaw direction, wrapping around at the 3.3 volt and 0 volt boundaries.
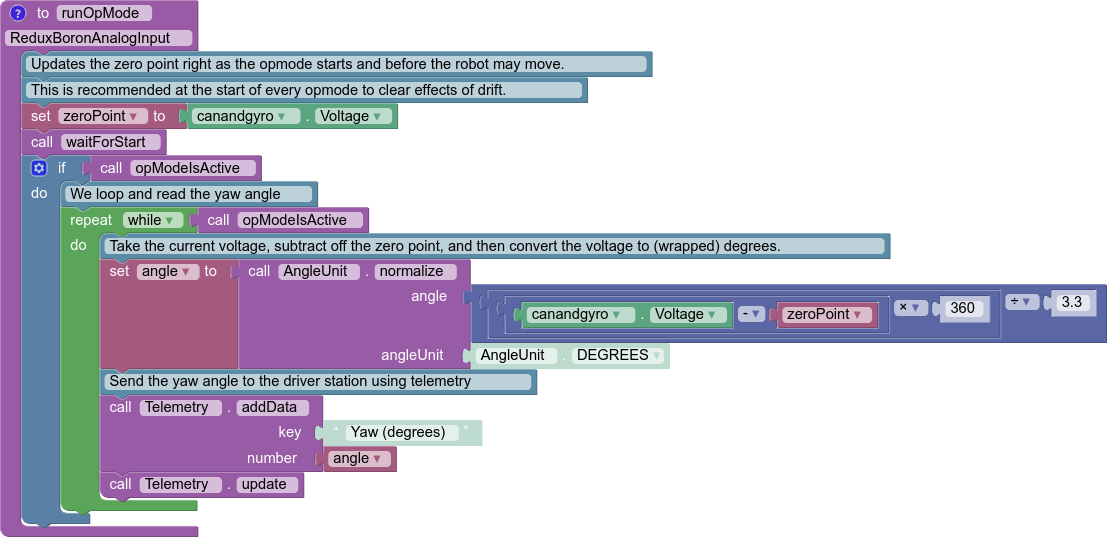
In typical operation, you will want to read and store the current voltage as a “zero offset” during init to compensate for any drift that may accumulate during field setup, and subtract that from the current voltage output, with some additional logic to “wrap” the value to within one rotation.
Below is an example with the Boron configured in the robot configuration as an Analog Input named canandgyro:
@TeleOp(name = "Boron Canandgyro Analog Input Demo", group = "Sensor")
public class ReduxBoronAnalogInput extends LinearOpMode {
  // We use an analog input for this exercise.
  AnalogInput canandgyro;  // Hardware Device Object
  double zeroPoint = 0; // the zero point

  @Override
  public void runOpMode() {

    // get a reference to our canandgyro
    canandgyro = hardwareMap.get(AnalogInput.class, "canandgyro");

    // Updates the zero point right as the opmode starts and before the robot
    // may move.
    // This is recommended at the start of every opmode to clear the effect
    // of any drift or shift in robot pose accumulated from before-match
    // setup.
    zeroPoint = canandgyro.getVoltage();
    // wait for the start button to be pressed.
    waitForStart();

    // while the OpMode is active, loop and read the yaw angle.
    while (opModeIsActive()) {

      // Take the current voltage and subtract off the zero point to get
      // the "voltage"
      // We then do a conversion from voltage (0 to 3.3) to degrees (0 to 360)
      // and finally wrap the angle between -180 to 180 degrees using
      // the AngleUnit.normalizeDegrees method.

      double angle = AngleUnit.normalizeDegrees(
        (canandgyro.getVoltage() - zeroPoint) * 360.0 / 3.3
      );

      // send the info back to driver station using telemetry function.
      telemetry.addData("Yaw (degrees)", angle);
      telemetry.update();
    }
  }
}
Actual implementation will vary from codebase to codebase (and ideally you will want to integrate bulk reads) but this hopefully demonstrates the general principles.
Field-centric teleop
Field-centric teleop lets your robot move relative to the frame of the field rather than relative to itself.
In practice this means when you press forward on the joystick your robot can move straight away from you and when you press back the robot can move towards you regardless of its heading.
For information on this, refer to the well-written Game Manual Zero mecanum tutorial.
Keep in mind you will need to convert the yaw reading to radians instead of degrees in the above example.
